-The LinuxSampler development team is happy to announce the release of
-a new version of LinuxSampler of Mac OS X. More information will be added here soon, so check back frequently.
-
-For now the sampler supports the CoreMIDI interface
-for MIDI input and jack for audio out. This means it currently runs only
-as a standalone application. An AU/VST interface will follow at a later stage, along with
-a network module to run multiple sampler slaves distributed on OS/X, Windows or
-Linux machines (Linux provides better performance) all controlled from a
-OS X or Windows box i.e. running the AU / VST sequencer.
-Even though LinuxSampler presently runs only as standalone app,
-thanks to jack you can comfortably route the sampler's audio outs back into your sequencer.
-
-LinuxSampler is implemented as a client/server application. This means
-the sampling engine (the server / backend) runs
-independently from the GUI (the client / frontend). Sampling engine and
-client can be run on the same box or on different machines too, connected
-over the network.
-
-The Mac OS X version provides all the features of the Linux version
-since it is built from the same source code base.
-This means when new features will come out the
-Mac OS X version will usually provide the same feature set as the Linux
-version. This was made possible by the very modular design of both
-low level, operating system functions and flexible audio / MIDI driver
-system.
-
-The Mac OS X version comes as an easy to install DMG file which will
-install all the necessary modules to run both the server ( linuxsampler.exe )
-and the GUI client. For now it installs only the qsampler GUI client
-as JSampler, the sampler frontend written in Java requires Java 1.6 which is not
-available on OS X yet. Of course you can run JSampler on a Windows or Linux box
-connected over the network to your OS X box or you could try to run it in a windows
-virtual machine. We discourage running a virtual machine along with the sampler
-as both applicationes are very CPU and RAM hungry therefore the performance
-of LinuxSampler will be suboptimal.
-
-
-
+
+The LinuxSampler development team is delighted to announce the release of LinuxSampler-1.0.0 for Mac OS X.
+LinuxSampler is an open-source disc-streaming software sampler that enables the expressive emulation
+of instruments by the means of MIDI-triggered rendering of large sample sets. While the modular design
+of LinuxSampler allows for multi-engine and multi-format features, the present implementation of the Gig
+engine already has the capability for producing virtual instruments with realistic emulations. VST (Linux, Windows)
+and Audio Unit (OS X) plug-ins for digital audio workstations (DAWs) facilitate the use of this sampler within audio
+and MIDI sequencer applications. With its LinuxSampler Control Protocol (LSCP), LinuxSampler can be controlled over
+a computer network so that a cluster can be used as a gigantic sampler. Since this network protocol is ASCII-based,
+frontends for it can be written in any programming language and for any operating system. LinuxSampler itself is a server
+application that can be controlled by GUI frontends like the C++-based Qsampler and the Java-implemented Fantasia. The
+present release can be deployed on Linux, OS X and Windows. The instructions for using the OS X binaries are outlined here.
+
2. Requirements
-
PPC or Intel Mac (an Intel Mac should provide much better performance)
-
Install JackOSX
- (if you don't have it already).
-
-
Download the latest version of the LinuxSampler Mac OS X installer
+
+
Combined binaries of LinuxSampler and its derivatives for both Intel- and PowerPC-based Apple
+ machines can be obtained by downloading the "LinuxSampler-1.0.0-OS_X.universal.dmg" disk image
from the LinuxSampler
- Download Page, and mount it on Finder.
+ Download Page.
+
+
+
After mounting and extracting the contents of the disk image on your computer's desktop,
+ open the "linuxsampler-1.0.0" volume. The following choices are available:
+
+
+
+
+
+
+
This disk image contains two sets of universal binaries. The first set designated simply LinuxSampler is linked to
+Apple's proprietary CoreAudio driver while the second LinuxSampler(JACK) folder contains binaries linked to the
+third-party JACK (Jack Audio Connection Kit) audio server framework. In addition there is also the LinuxSamplerAU.component
+Audio Unit plug-in which can be used within OS X-deployed DAWs for loading up virtual instruments.
-
You will find a single folder "linuxsampler051-mac-20080102". Copy this
- folder to wherever you like (e.g. under /Applications).
+
+The LinuxSampler folder contains the triple-architecture (ppc/i386/x86_64) universal binaries of "linuxsampler" and the
+"LinuxSamplerAU.component" DAW plug-in.
+
+The LinuxSamplerAU.component plug-in should be dragged and dropped into the /Library/Audio/Plug-Ins/Components folder as
+shown by the rightward arrow. In a similar way, place the LinuxSampler folder into the /Applications folder
+
+
3.1. Loading a Virtual Instrument in your DAW
+
For a basic demonstration, we will load up the LinuxSamplerAU plug-in into GarageBand. First open the "Track Info" window:
+Track / Show track Info. Then in the Track Info window select "LinuxSampler Unit" from the "Generator" tab.
+
+
+
+
+
+
A gig file can then be loaded using the "qsampler" or "Fantasia" application. Click on the "Add channel" icon
+ in qsampler in order to load a gig file.
+
+
+(Note: JackOSX installation is NOT recommended in this setup since the Jack Audio Connection Kit hinders the initialization
+of both qsampler and Fantasia.)
+
+
5. The LinuxSampler(JACK) package
-
-
-
4. Using the Applications
-The folder contains three items, "bin", "linuxsampler" and
-"qsampler".
-
-
Start qsampler.app. The application launches, and you
-will see messages saying that linuxsampler is now running. After a
-while, you will also see that the JackPilot application (installed by
-the JackOSX installer) automatically launches showing the Jack server
-already running.
-
-Since CoreMIDI is sometimes too slow to respond when creating a new MIDI device.
-so you need to increase "Timeout" parameter in the
-Options:Server Settings to, 10000 msec.
-
-
-
+This archive contains dual-architecture ppc/i386 binaries of linuxsampler and "qsampler" which function together with
+ JackOSX. This setup can be used for running various Jack-enabled applications simultaneously: a setup
+ that is particularly useful for live situations.
+
+
+
+ After opening the linuxsampler-1.0.0 volume, place the LinuxSampler(JACK) folder into the /Applications directory as
+ indicated by the leftward arrow at the bottom.
+
+
+
+
4.1 Setting up MIDI Input
-In qsampler click on the device configuration tab.
-Click on the MIDI devices icon and then on Create.
-
+In qsampler click on the "Device configuration" icon and then on Create.
+
+
+
+
+If you need multiple MIDI input device, set the "Number of ports" to 2, 3, ... before creating the MIDI device. The multiple ports will be accessible from other MIDI applications as "Linuxsampler_in_0", "Linuxsampler_in_1", etc.
-You can create an arbitrary number of MIDI input devices by repeating
-the procedure above.
-Each MIDI device can be routed to arbitrary sampler channels.
-
+(You should be able to create an arbitrary number of MIDI input devices by repeating "Create", but this feature does not work well yet.)
+
4.2 Setting up Audio Output
-LinuxSampler currently only supports the jack driver model for audio output
-on Mac OS X.
-Click on AUDIO devices icon and then on Create.
+Start the Jack audio server using JackPilot.app. The qsampler application can then be launched by double-clicking on its icon.
-You can of course save and load sampler session as LSCP files which will
-automaticall set up audio and midi devices and load samples into the channel strips.
-
+
+
Connect audio ports:
In the "Connections Manager" pane of JackPilot: linuxsampler --> Built-in audio: in1 & in2
or
- In the "Connections" window of qjackctl: linuxsampler --> coreaudio
+ In the "Connections" window of qjackctl: LinuxSampler --> system
+
-
+
+
+
Intel Mac Note: to use built-in audio in Jack, you need to create an "aggregated device" by using "Audio MIDI Setup". Please look up Jack manual for details.
+
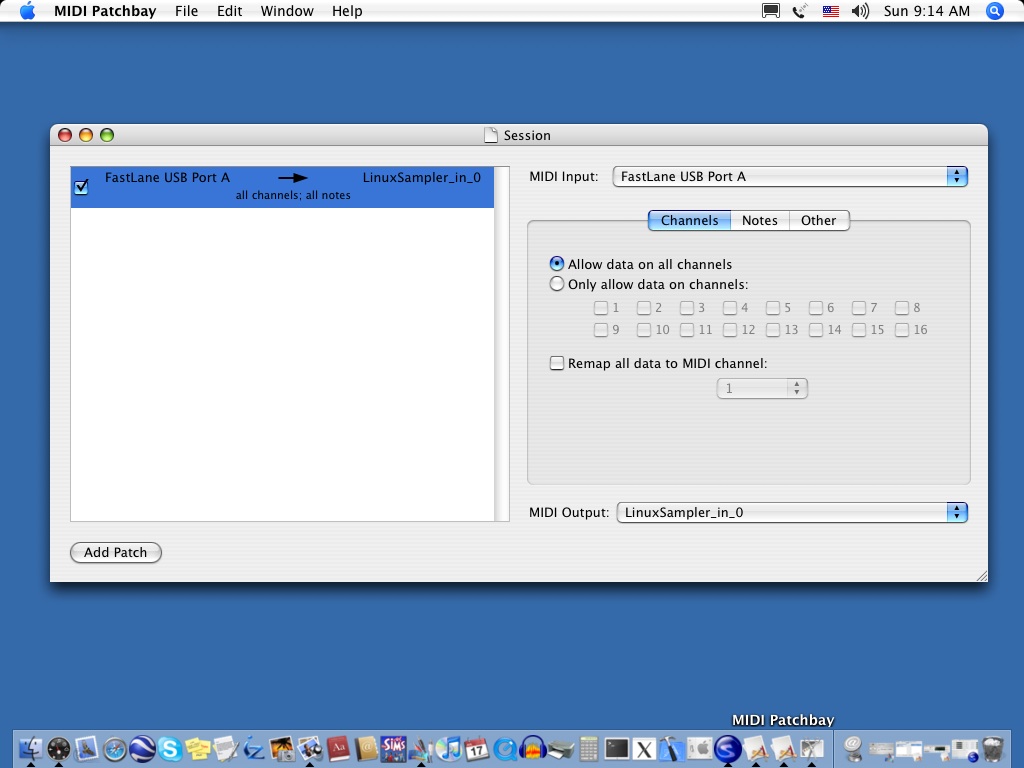
Start MIDI Patchbay.app and connect your MIDI Input instance (probably your MIDI interface or USB-enabled keyboard) to the "LinuxSampler_in_0"
- MIDI Output
+ MIDI Output
Click on Add Channel. A dialog will appear.
Select the GIG file you want to load, the instrument within the GIG file,
Audio device, MIDI device, MIDI port and channel.
-Click OK.
+Click OK. The user can then save *.lscp files for convenient future use. In this way, the user can automatically set up audio and midi devices and
+load samples into the channel strips when recalling a setup.
-
5. Installation Troubleshooting
-TODO
-
6. Detailed Documentation
-You find more detailed documentation about our software on our official
+
-There could be several bugs in the Mac OS X version of LinuxSampler which we hope to root out soon.
-Please report them using our bug tracking system:
+
6. Bugs, Problems and Feature Requests
+Our Forum is a good place to ask for help:
+
+ https://bb.linuxsampler.org
+
+We have a dedicated forum section for
+newbies and support.
+
+
+Please report any bugs using our bug tracking system:
The current LinuxSampler for Mac OS X binary distribution does not ship with gigedit yet
-
-Toshi writes: I tried gigedit with X11 and gtk on my Mac. It worked, but the
-installation process was too much complicated for ordinary users (so
-complicated that I cannot remember exactly how I did that myself). We
-still have a long way before gigedit can be part of binary distribution
-for Mac.
+
The current LinuxSampler for Mac OS X binary distribution does not ship with gigedit yet.
+While gigedit works using gtk with X11.app, the large number of dependencies
+on external libraries makes it very arduous to prepare a universal binary.
-
if you overload the sampler (CPU overload or disk overload) it
- produces noises
+
Overloading the sampler (CPU overload or disk overload)
+ produces noise.
QSampler crashes when one tries to create a second port of jack.
An error dialog saying the device was not created, after the dialog is dismissed the QSampler crashes.
- Another problem in QSampler. It sometimes fails to quit
-gracefully, and I need to do "Force Quit". After force quitting, the
-linuxsampler subprocess is still running and I need to stop it by
-"killall linuxsampler".
+ Sometimes qsampler fails to quit gracefully; this calls for "Force Quit". After force quitting, the
+linuxsampler subprocess is still running. In this case, simply invoke "killall linuxsampler" from Terminal.app to terminate
+linuxsampler.
+
-
8. Credits
-Thanks to Stephane Letz (Initial OS X port) and Ebrahim Mayat (OSX Howto fixes, testing, screenshots)
+
 HOWTO by Toshi Nagata
 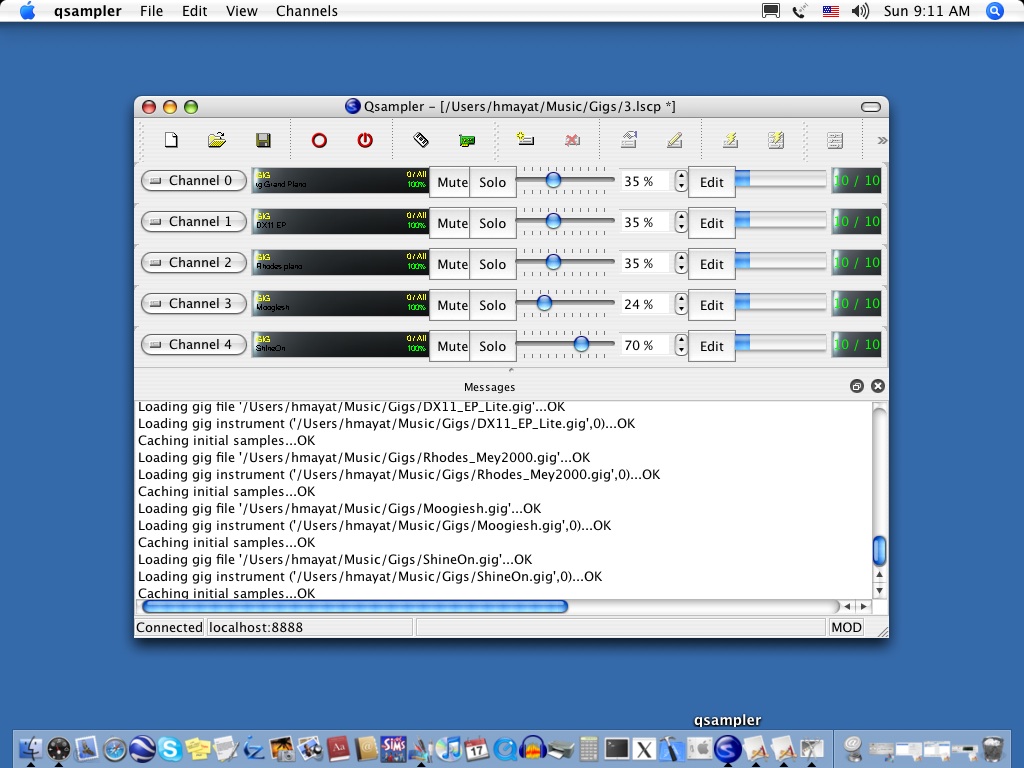 -
+
+The LinuxSampler development team is delighted to announce the release of LinuxSampler-1.0.0 for Mac OS X.
+LinuxSampler is an open-source disc-streaming software sampler that enables the expressive emulation
+of instruments by the means of MIDI-triggered rendering of large sample sets. While the modular design
+of LinuxSampler allows for multi-engine and multi-format features, the present implementation of the Gig
+engine already has the capability for producing virtual instruments with realistic emulations. VST (Linux, Windows)
+and Audio Unit (OS X) plug-ins for digital audio workstations (DAWs) facilitate the use of this sampler within audio
+and MIDI sequencer applications. With its LinuxSampler Control Protocol (LSCP), LinuxSampler can be controlled over
+a computer network so that a cluster can be used as a gigantic sampler. Since this network protocol is ASCII-based,
+frontends for it can be written in any programming language and for any operating system. LinuxSampler itself is a server
+application that can be controlled by GUI frontends like the C++-based Qsampler and the Java-implemented Fantasia. The
+present release can be deployed on Linux, OS X and Windows. The instructions for using the OS X binaries are outlined here.
+
-
+
+The LinuxSampler development team is delighted to announce the release of LinuxSampler-1.0.0 for Mac OS X.
+LinuxSampler is an open-source disc-streaming software sampler that enables the expressive emulation
+of instruments by the means of MIDI-triggered rendering of large sample sets. While the modular design
+of LinuxSampler allows for multi-engine and multi-format features, the present implementation of the Gig
+engine already has the capability for producing virtual instruments with realistic emulations. VST (Linux, Windows)
+and Audio Unit (OS X) plug-ins for digital audio workstations (DAWs) facilitate the use of this sampler within audio
+and MIDI sequencer applications. With its LinuxSampler Control Protocol (LSCP), LinuxSampler can be controlled over
+a computer network so that a cluster can be used as a gigantic sampler. Since this network protocol is ASCII-based,
+frontends for it can be written in any programming language and for any operating system. LinuxSampler itself is a server
+application that can be controlled by GUI frontends like the C++-based Qsampler and the Java-implemented Fantasia. The
+present release can be deployed on Linux, OS X and Windows. The instructions for using the OS X binaries are outlined here.
+
 +
+  +
+  +
+ +
+
+
+  +
+  +
+